Video is a way to collect and record important scenes and occasions such as parties, weddings, ceremonies, travels and lectures. Thus, it further plays a part in helping people remember their crucial moments in daily life. Cutting or trimming a video via a browse or software is easy, but how to make some more complicated editing by adding more special effects? So a series of video editing software has made their way into market. The article will mainly introduce the steps to add transitions to video and other necessary information. Do not miss: it will give you a guide.
- Part 1. What is Transition?
- Part 2. Best Video Editor Accessible
- Part 3. Steps to Add Transitions by VideMake
- Part 4. FAQ
- Part 5. Conclusions
1. What is Transition?
Transition is a popular component of special effects used in video editing to connect one shot to another. Its roles are akin to conjunctions and transitional words in sentences. It gives viewers a smooth and rational shift between scenes, and sets the stage for the next scene. Compared with abrupt cut between two scenes, adopting transition effects can make your video more active and creative. Usually, transitions can be classified into fade in/out, zoom, push, insert, wipe, slide, etc. These various types of transition represent different meanings and can deliver diverse active effects, so users may need to think thoughtfully based on their purposes and preferences.
2. Best Video Editor Accessible
Considering that users may have no enough time to search and retrieve wonderful video editor, here are examples of best apps: VideMake Video Editor, NCH VideoPad Video Editor, Movavi Video Editor, VSDC Video Editor and CyberLink PowerDirector. All these are multi-functional. However, I' d like to recommend VideMake for a pro, because concerns about the complicated operation are just overblown when using the software.
VideMake has more than 40 categories of transitions for users to select and choose, such as fade in/out, slide left/right, row whisk, cross merge, etc. And the operation to add transition is easy-to-use. Just drag and drop. Thanks to simple methods, users can change the duration of transition and add several transitions to a video or several videos.
Besides the benefits above, VideMake has its free trial version without too much functional limit. What' s more, you will discover a great variety of special effects including texts, background music, filters and split screen. With these effects, your video will be colorful. Beside these features, you can try to be a creator by using in-built screen recorder. Well, it also supports audio files.
Let us start with how to add transitions to video.
3. Steps to Add Transitions by VideMake
After having a rough knowledge of creative transitions, you can' t wait to have an realistic experience to add transitions to video. Let' s start by taking VideMake as the example. When you use VideMake, you only need three simple steps to produce an awesome work by yourself. Before referring to the following instructions, make sure that you download and install the software VideMake Video Editor in www.VideMake.com.
Firstly, a video tutorial is prepared for you:
Step 1: Import your local video files

When you open the home page of VideMake, you can click the first button on the left side, and then you will find the button "Import" which is used for you to open your local video files. Another alternative way VideMake offers is to click "File", choose "open project" or "import media" or use the keyboard shortcut "Ctrl+O" and then the media file will be showed in the screen.
Step 2: Add transitions as you like
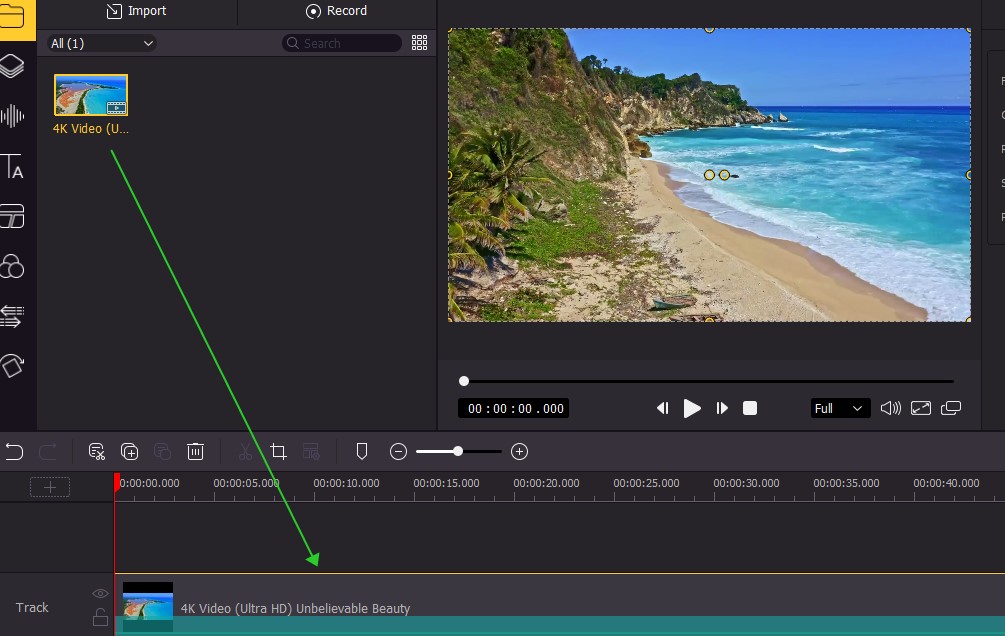
First of all, before you add transitions, avoid forgetting adding the video you import to the track. You can directly drag the video and drop it to the track or select the video and right click “add to the timeline”.

Next, find the option "transition" (see picture above) and you will see a lot of transition effects. You can freely select a type and then drag it to the timeline.
Of course, you can also control and adjust the duration of transitions according to personal need. The fix is to circle the transition frame and then drag its border line to extend or lessen the frame size.
Step 3: Output the file after finishing editing
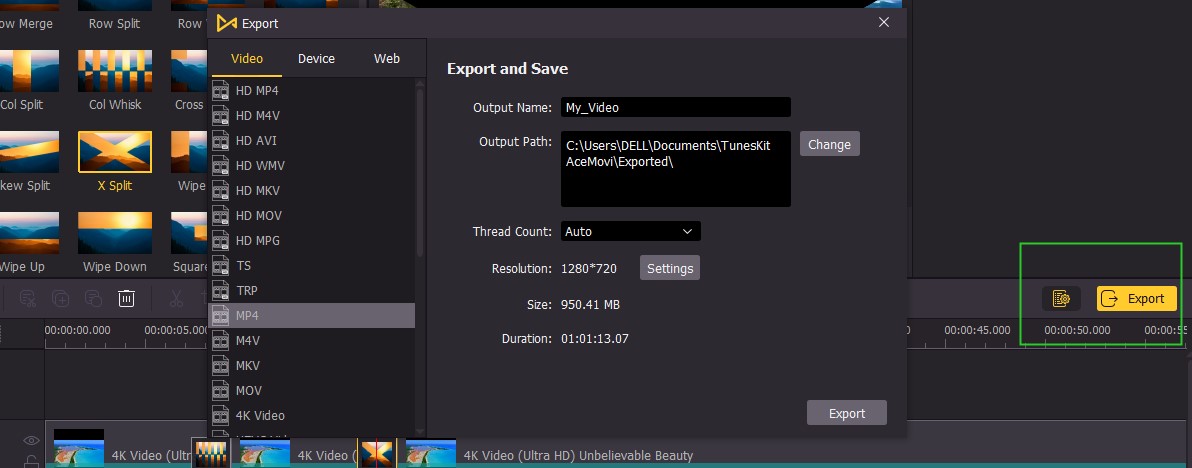
After finishing editing and preview and confirm that there is no mistake, you can click the button "export" and output you final but creative video.
User may discover that when they export the adjusted file, they can select various video formats and devices, and share the file to platforms such as YouTube and Facebook. This kind of benefits must be a boon for users.
4. FAQ about Adding Video Transitions
I guess you may be concerned about other issues. Here, some representative questions are listed and answers given.
1. Can I add and edit two or more video files at one time?
Of course, yes. Just follow the first step above, and you just click "import" for several times. As for your wishes to add transitions between two different video files, VideMake is also ready to come true your wishes. What you need to do is just to drag the two videos to the same track and add transitions to video.
2. Can I add several transitions in a video?
Yes. See the following picture.
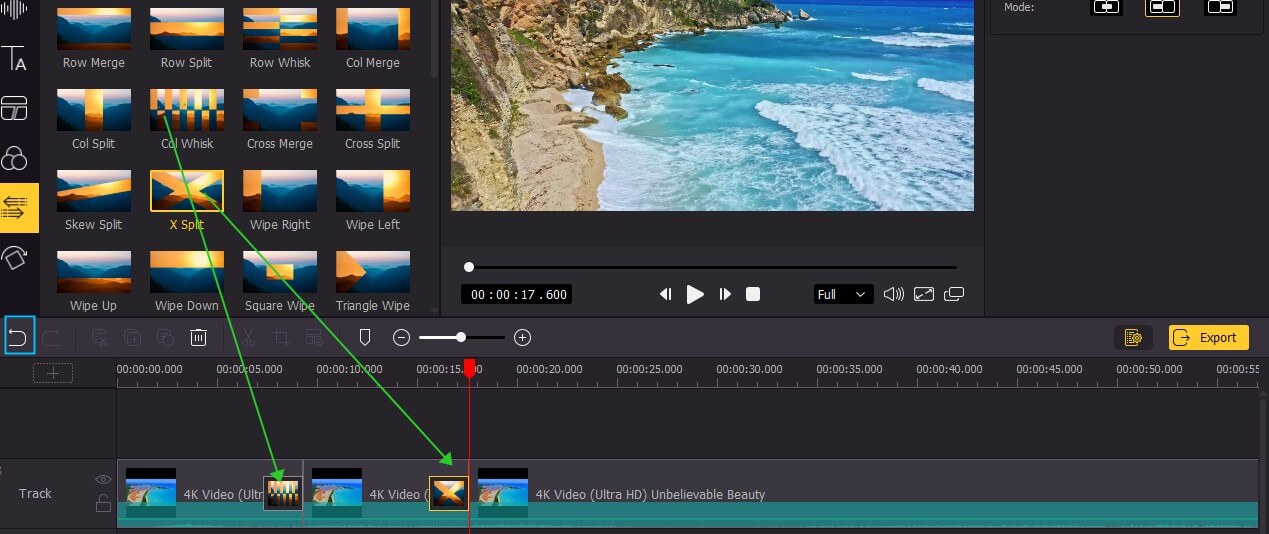
So how to realize this kind of effects?
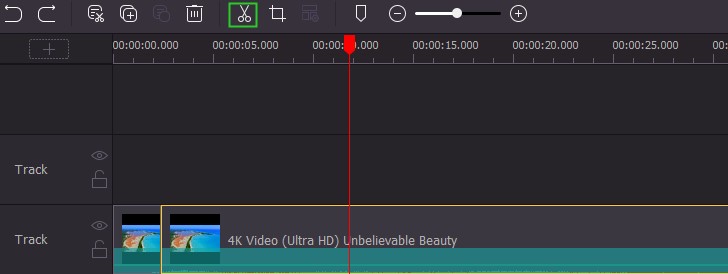
Prior to adding two or more transitions, you should firstly split the video timeline into several segments. The splitting method is to drag the red line to the section you want to cut and then right click "split" or click the icon below.
3. Can I leave blank space between two segments?
I' d like to say to avoid blank space between two segments.

If you run into the occasion depicted above, you will fail to add or drag any transitions to the timeline. Be aware of this point. The right solution to this issue is to drag the third segment to seamlessly connect the central segment.
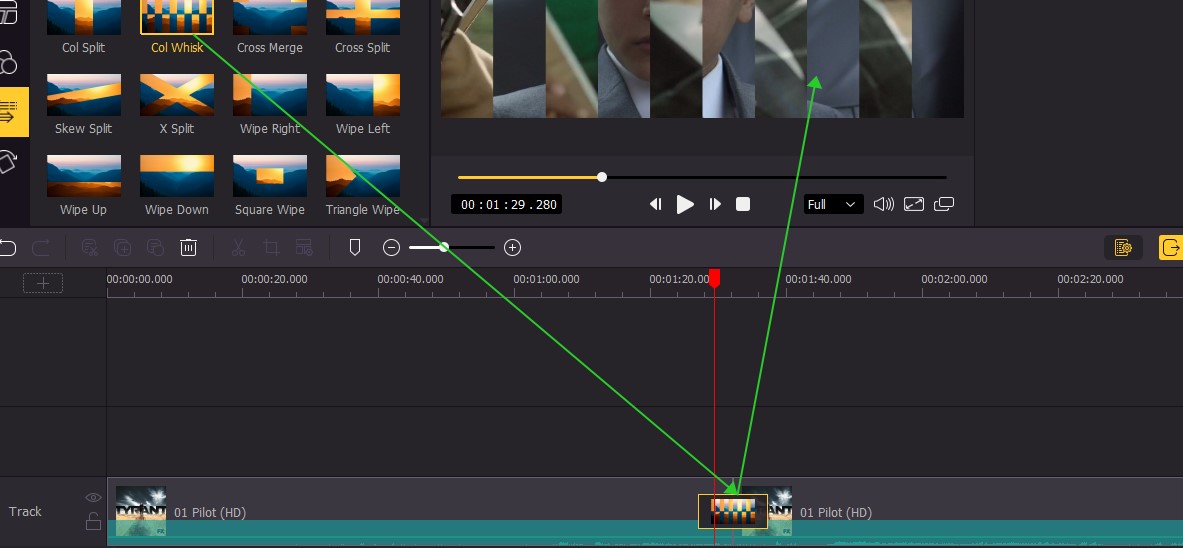
4. Can I drag the transition to the center of the two segments?
Yes, you can. The answer can also be showed in the following picture.
5. Conclusions
If you have already been landed in troubles to add transitions to video, I am convinced that VideMake will come as a revelation to you. Do not hesitate. Only three steps are needed: import, add and output. Even if you are confronted with a new question in practice, more technical specifications and instructions are available for you. The final point that must be mentioned that VideMake' s free trial version can allow you to have a taste of its majority of functions. Just begin to enjoy it.

