Taking a picture of a video is one of the basic skills when you play a video or record a new clip. However, not every video editing software or app offers a one-stop experience to marshal captured snapshots or generate a photo slideshow with music and transitions. If you need to create a photo from a video, you need to find a tool that is able to take video pictures without remaining unnecessary shapes. Easy peasy! We're about to take a snapshot in 4 ways that come with smart screencast capture features, along with an auto-save function as well as multiple, useful media editing tools.

- Tactic 1. Best Choice to Take Pictures from Your Video for PC/Mac
- Tactic 2. How to Create a Screencast when Play Videos with VLC for Computers
- Tactic 3. How to Generate Video Snapshots by Windows Movie Maker
- Tactic 4. How to Make a Snapshot from a Video on Mobile Phones
- Sum-Up
Use VideMake to Take a Video Snapshot with One Click
VideMake Video Editor is a multi-purpose magic tool for video content creation and making. VideMake is composed of video playing, recording, editing, converting, speeding, and resizing. With this software, boosting the quality of your media, video, image, or audio, is super easier than ever. No need to worry about the video format or video size, as it supports a lot of popular video formats, and you can import or export large-size videos instantly.
You may want to know does VideMake will leave watermarks on your taken snapshots or whether the quality will be cut after the process. On the demo version which can be downloaded for free, taking pictures from a video is free and has no watermarks. If you subscribe to it, the videos you export comes with no logos. Let's learn how to take a snapshot from videos.
VideMake Snapshot Creator
- Take snapshots when record Webex/Zoom meetings
- Great UX for beginners
- Works with low-end PC or Mac
- Low-budget and cost-efficient
- Create photo slideshow with music and transitions
- Auto-save snapshots on high-quality
How to Take a Snapshot from Videos by VideMake
Download VideMake as your video editing helper. Add videos to the timeline
Here are the links to download the latest versions of VideMake Video Editor. On the free version, video effects, music resources, sound effects, text templates and more are free to use. When you download it, click the "Import" icon to add your videos and then drop them into the timeline.
Begin to take a snapshot from your video by clicking on "Snapshot"

There are some icons set around the canvas, including "Snapshot", "Play", "Volume", etc. When the video hits the scenario you want to capture, hit the "Snapshot" button to screencast your media file.
Change the location to save your photo snapshots

First of all, when you have your video picture captured, you can find it auto-saved in the "Media" panel. If you need to personalized snapshot location, go to the menu and click "File" > "Preference" > "General" > "Snapshot Files". Click "Change" to alter the save path as per your needs.
Take a Screencast from a Video with VLC Media Player
Want to use the most popular video media player VLC to take a picture of your video. As one of the cross-platform and device-friendly video players, VLC is available on Windows, Mac, Linux, and even mobile phones (although their phone version stills needs to be promoted). In addition to playing multiple video formats, VLC is powerful in adding effects and mixing sounds. Now, let's go on to learn the tutorial.
Open VLC Media Player from dekstop. Click "Media" > "Open File..." to upload
Speaking of importing video files to VLC, you can directly drag and drop your videos on the user interface, then VLC will play your video automatically. You can customize the aspect ratio, video resolution, playback speed, audio volume, and so on. Another way is click "Media" > "Open Files..." from the menu bar.
Play your video and hit the "Snapshot" button when the wanted frame occurs
The "Snapshot" button is next to the "Play" icon, which can be found easily. You can move the timeline and play the frames you want to capture. When the video hits the frame, just click "Snapshot" to get started. You can take as many pictures as you want in VLC Media Player.
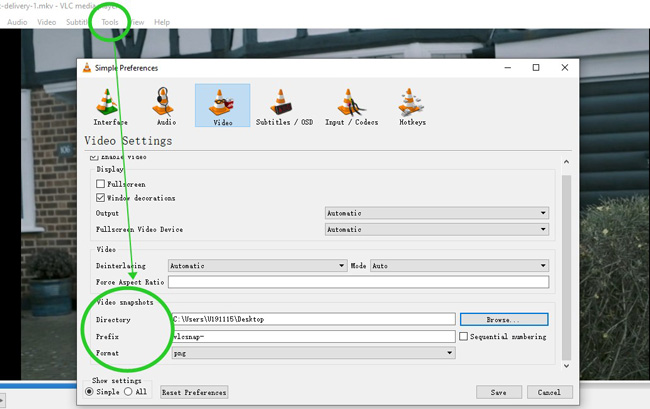
Navigate to "Tools" > "Video" > "Video Snapshot" to adjust save path

Adjusting the snapshot save path in VLC Media Player is not as easy as VideMake, as you can find that VLC composes hundreds of video playing and editing elements. Thus, you need to click "Tools" > "Preference" > "Video Snapshots" > "Directory" to adjust the location. By the way, the video snapshots you take will be saved automatically.
Take a Snapshot from Clip with Windows Movie Maker for Windows
Windows Movie Maker is a royalty-free video editing tool merely for Windows systems. Users cannot download its official version since Windows Essentials (Including Windows Movie Maker, Windows Photo Gallery, Windows Live Mall, et.) has discontinued it. But you can still find websites to download Windows Movie Maker for free. And here we'll show you how to use it to take a picture of your video step by step.
Run Windows Movie Maker on your PC. Add your video to play in real-time
With the link mentioned above, you can free download Windows Movie Maker. When it comes to uploading new clips to it, you can put your files under the user interface with no hassle. In addition, you can enlarge the performance monitor to get a better user experience.
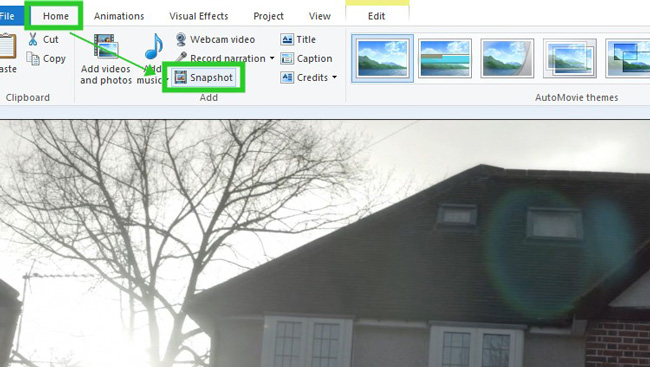
Click "Home" > "Snapshot" to take a picture from video

On the menu bar, you can find "Snapshot" from "Home" and begin to take an image of your videos. You can hit the timeline to move into the frames you prefer instead of waiting for a long time until you can see the wanted frames.
Edit the captured snapshot and define the save path

You need to know two things. Firstly, you need to set an exact save path on your computer. Both file name and save type should be altered. After that, click "Save" to get your pictures from the destination you set. The second point is that you can find the pictures saved automatically after the video clip on the timeline. Windows Movie Maker allows you to edit the snapshots with built-in features, such as music and subtitles.
How to Take a Snapshot from a Video on iPhone and Android
We all know that both iPhone and Android systems support shortcuts to take a screencast or snapshot while playing or recording video. For example, you can press the first button on your left-hand place and the "off" switch simultaneously to create a picture on your iPhone. While for Samsung, you need to hold the "Volume Down" button and the "Power" button at the same time.

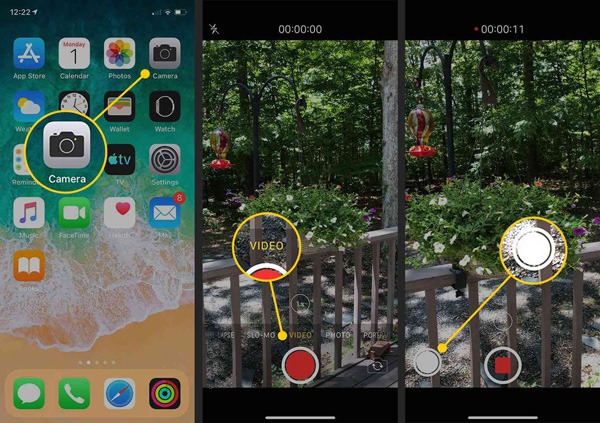
To take a screen snapshot while recording videos, you need to go to "Camera" > "Video" and start recording directly. You see two buttons on the screen, one is white and the other is red. When you record the video, click the white icon to take a picture. All of the pictures will be automatically saved to the phone album without losing quality.
Sum-Up
You may find that taking a screencast from a video is easier than your thought once you know which video player or editor to pick up and where to click on. However, the operation on Windows and Mac is different from on mobile phones. And sometimes you may face with problems logos or a triangle appearing on the screen. In this case, we suggest you download your video to computer and take pictures of your videos.

