MKV, also known as Matroska video file, is an average container media that is composed of indefinite subtitle, video, audio, and image tracks. Compared to MOV, MN4, or AVI formats, MKV is larger due to the support for additional functions and additional elements. When MKV videos are coded with high compression ratios, they are small in file size yet have high video resolution. But the most vital point is that MKV supports FLAC, which makes itself a better format for lossless digital audio track compression.
Here is one of the basic skills to edit MKV videos on macOS by video editing tools-Split MKV video into parts or trim MKV on Mac to remove unwanted clips you dislike. Easy peasy!

- Way 1. Easiest, One-Top Software to Trim MKV Video Files in Mac
- Way 2. How to Split an MKV Video into Several Parts by iMovie
- Way 3. How to Slice Crack Your MKV Media on Mac with MKVToolNix
- Tips to Make Trimmed MKV Better
- Summary
VideMake Video Editor & Splitter-Trim MKV File on Mac
A trackless, all-in-one, responsive MKV splitter introduced here-VideMake Video Editor, which is admired by millions of content uploaders from YouTube and Instagram. Trimming batch MKV files with a couple of clicks under the user-oriented interface is easier than ever. The interface allows you to put any media to start editing in no time.
Besides being an MKV video splitter for Mac, VideMake is adequate in converting, recording, reversing, volume changing, slow motion making, compressing, cropping, as well as titling. That is to say, users can execute motley video editing features and effects by this program to achieve what they want. Convert MKV to MP4, AVI, WMV, MOV, etc., change the video resolution of your MKV files, and more capabilities are included.
VideMake MKV Splitter
- Convert MKV to MP4, AVI, MOV, DivX, or others
- Trim one single MKV video or batch MKV files
- Convert video resolution up to 2160p/4K quality
- Add/overlay dynamic subtitles or text templates
- All advanced effects on demo versions are free
- Upload and download videos without file size limit
User Guides to Trim MKV Video with VideMake
Download VideMake Video Editor for free. Click "Import" to upload video
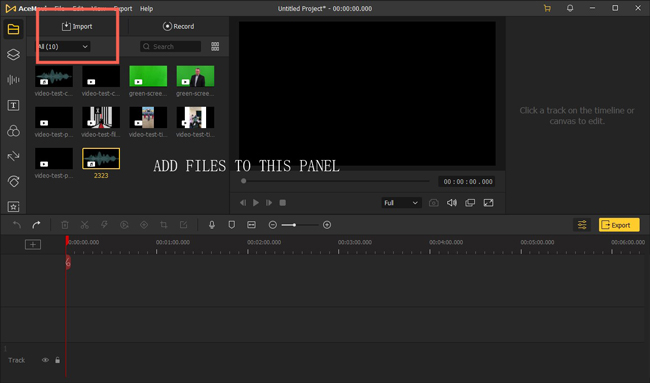
Download VideMake here, 100% safe and effective. Launch VideMake on your computer by clicking on its icon. When it comes to importing MKV files on the timeline, just drag-n-drop them. Using the dropdown option or search bar to organize your video or other files quickly.
Move Playhead on trimming points, click "Split" from toolbar to split
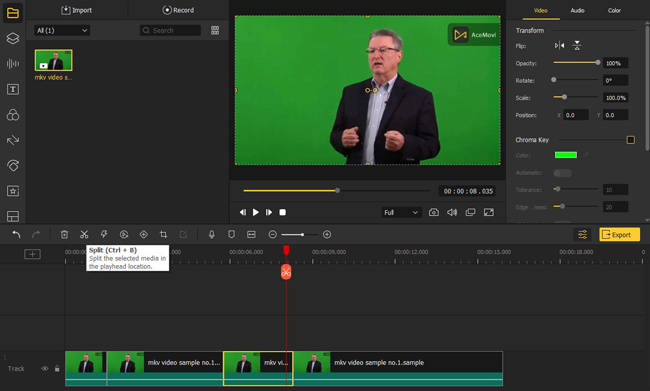
When the playhead (red line) hits the points you want to split. Click the "Split" icon or right-click the highlighted clip and then select "split" to commence the process directly. You see two parts that were seperate from the original video you trimmed just now. Delete the one you want.
Export MKV video on correct format, with high-quality resolution output
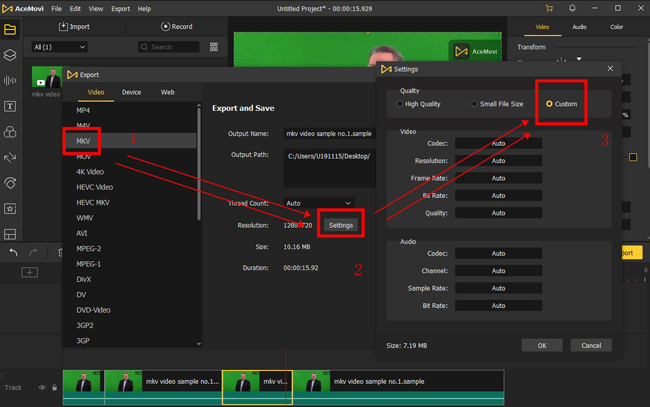
Click the "Export" icon which is colored yellow to export your video from VideMake. On the workspace, you're allowed to change the save path, video resolution, and output path. For advanced settings, click "Settings" > "Custom", then choose the meticulous dialogues to tune, including codec, resolution, frame rate, bit rate, and quality.
iMovie-Trim MKV File without Watermarks
Want to trim MKV files on Mac with iMovie without watermarks? iMovie is pre-installed on your computer, so that it is no need to download extra, which is a powerful and free video editor for Mac users only. Choose your video and select the opening way "by iMovie", or open iMovie and then import your MKV files to it to begin. In addition, this software empowers users to add filters, change video resolution, alter playback speed, put green screen, etc. Follow me to trim MKV videos by iMovie.
Open iMovie from desktop. Choose MKV videos and add them to user interface
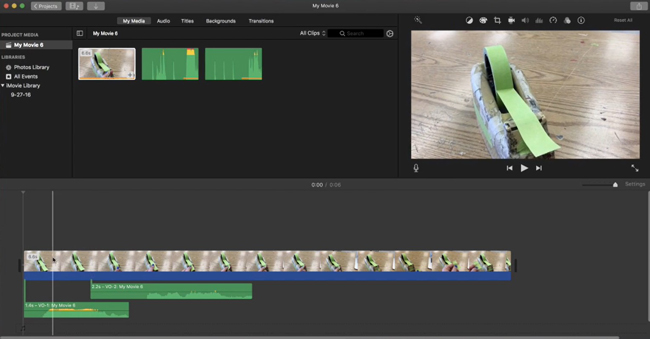
On the menu, you can click buttons to import your MKV files at once. In fact, you can put the files under the timeline outright. iMovie was pre-installed, so you don't need to download it from the app store in advance.
Highlight video clip, movie the pointer, and choose "Split Clip"
iMovie offers the shortcut "Command+B" to start trimming a video from the timeline. First of all, place the pointer at the trimming lines, after that, right-click your video click to select "Split Clip". After that, the video part that has been trimmed will be separated from others, which can be deleted by you.
Download video with wanted format, resolution, quality, and compressoion
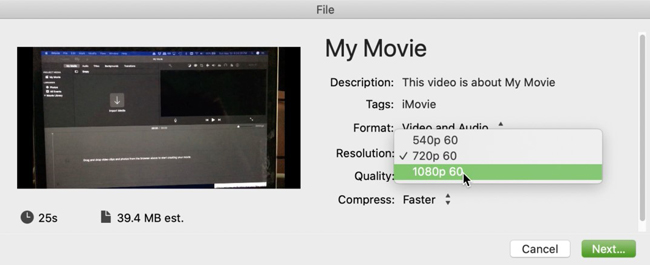
As for exporting videos in iMovie, you can choose to change the video format with audio or video, convert video resolution up to 1080p with FPS, quality, and well as compression value.
MKVToolNit-Trim an MKV File Professionally without Frame Loss
Plot to get an open-source, free, and professional MKV video trimmer to split it losslessly? MKVToolNix is a collection of functions for the Matroska media format, which can be downloaded for multiple devices including Mac, Windows, and Ubuntu Linux. As for its ability, you can use it for trimming, combining, converting, adding subtitles, inserting audio, or else. Follow the tutorials given below on trimming MKV files with MKVToolNix.
Download MKVToolNix. Click "+Add Source Files" to import MKV video
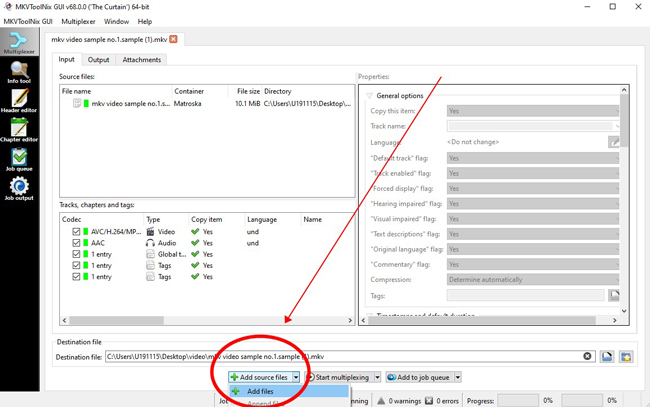
MKVToolNix is an open-source and free MKV video editing software, in other words, you can download it on Mac, Windows, or Ubuntu Linux. This software has no real-time performance monitor, so it may be a little intricate for beginners. Just press "+Add Source Files" to upload your videos to this tool.
Go to "Output" > "Splitting" > "Split Mode" to split MKV
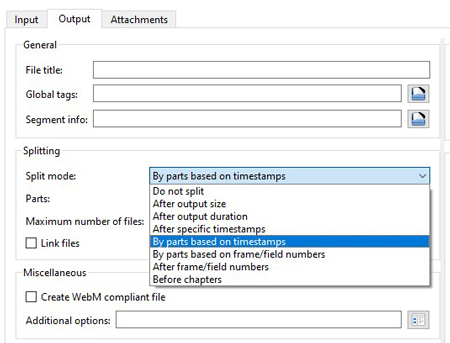
Follow "Output" > "Splitting" to find the function for trimming the MKV video. You can choose the split mode, parts, and maximum number of files. You can input accurate timestamps to determine the trimmed parts of your MKV files. The split mode is designed to help you make sure which parts are going to be trimmed or left.
Set your save path and click "Start Multiplexing" to download trimmed MKV

Click "Destination file" to change the save path as per your needs. When you get ready, tap on "Start Multiplexing" to start trimming. After that, open up the folder you set before for storing the trimmed or edited files.
Tips You Need to Know when Trimming MKV Videos
1. Choose a proper MKV video splitter
Video editing programs are separated into many categories for multiple purposes. It is no denying that video-splitting is the basic skill supported by most video editors. But if you want to losslessly trim an MKV file on Mac, which not only requires you to find a tool that supports macOS but the splitter is well-performed. Thus, we've introduced three efficient MKV splitters here, pick up one of them to start trimming.
2. Use MKV-trimming shortcut to save time
Most video makers support keyboard shortcuts to help users save time and make work more efficient. For example, the shortcut for splitting a video of VideMake is "Ctrl+B" and iMovie is "Command+B", especially if there are multiple files, using a shortcut can be definitely more flexible.
3. Adjust video aspect ratio and video resolution
Video aspect is the proportion between the height and width of the canvas, while video resolution is the pixels of your files that determines the quality of your video. Using the cropper to change the video aspect ratio to 16:9, 9:16, or others. And if you need to make the video resolution high, edit it with "1080p" and "2160p". Both of the two elements have an impact on the viewing experience of your content.
Summary
Apart from splitting MKV video files on Mac, these introduced MKV splitters are designed to record a new clip with background music, crop video projects to meet the requirements of different media, make slow-motion or fast-motion video clips, and convert within hundreds of popular video formats as per your specific needs.

